If video doesn't load- try using Chrome browser and make sure sound is turned on
IMPACT RECOVERY SYSTEM
-
DIRECTIONS FOR USE
-
VIDEO
-
AS/NZS 3845.2 CERTIFICATION
If you can't find what you're looking for- please use the contact form to contact us or call us on 0414628511
-
STEEL BOLLARDS
-
STAINLESS STEEL BOLLARDS
-
IMPACT RECOVERY SYSTEM


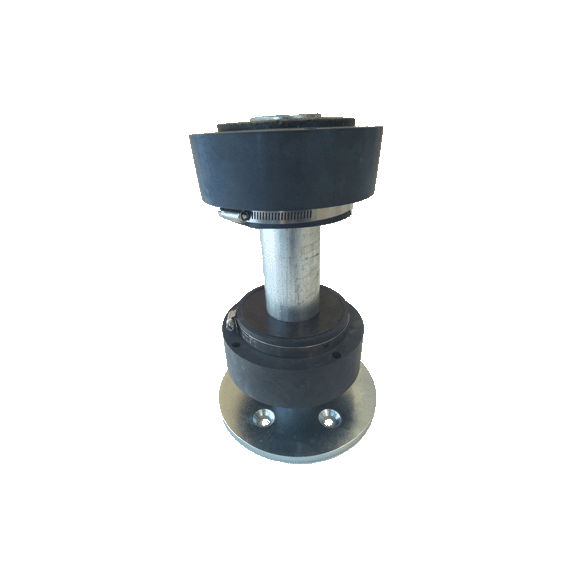
INSTALLING SURFACE MOUNT IMPACT RECOVERY BOLLARDS
Secure Re-usable Base plate to solid concrete footing large enough to ensure it will not be dislodged when bollard is impacted
1. Place base plate on footing and mark where holes should be
2. Use 10 mm drill bit to drill holes in concrete footing to accept concrete anchors
3. Insert the countersunck galvanised concrete anchors in the holes and tighten until they are flush with base plate
4. Slip resistance core over upright spiggot (find indent) and secure using small securing stud
5. Secure rings to upright spiggot using stainless steel clamps provided
6. Slip bollard over rings and secure using 40 mm securing stud
VIEW INSTALLATION INSTRUCTIONS

INSTALLING ZERO WASTE FOUNDATIONS
The main thing to remember is that these foundations will last 100 years or more if installed correctly, so do NOT cut corners
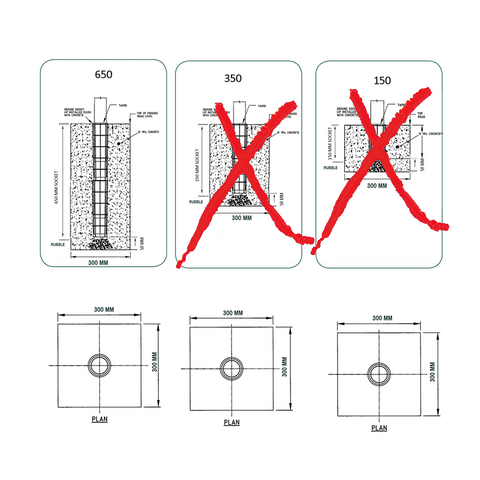
IMPORTANT NOTES:
1. Ground Socket is installed flush with surface and must be completely encased in concrete. A minimum of 150 mm quality 30MPa concrete is required on all sides of socket to protect surrounding paving and socket from damage when bollard is impacted.
2. Pierce base of socket (weak spot provided) using screwdriver or drill and place rubble beneath socket to allow drainage.
3. Allow space for paving/ asphalt so ground socket finishes level with road or footpath (no trip factors)
4. When digging hole- ensure sand does not fall in making footing tapered inward as this will make the footing unstable. If soil is too dry and sandy we suggest making a frame out of wood or reo cage to support the sand whilst installing the concrete footing
5. DO NOT USE flexible grout or rapid set, as rapid set is not resistant to impact and grout will enable socket to over-flex and possibly cause damage.
6. Make sure you install caps once installation tool is removed, especially before spraying asphalt.
PAVED AREAS /ASPHALT
Core drill or remove pavers and dig hole depth of ground socket (350 or 650 mm depth) allowing space for paving/ asphalt so ground socket finishes level with road or footpath (no trip factors)
Pierce base of socket (weak spot provided) using screwdriver or drill and place rubble beneath socket (to allow drainage) and alit concrete to secure socket in position..
Use installation tool to position socket upright in hole and pour concrete level with ground (allowing room for paving/ asphalt if necessary). Check alignment.
Once concrete has cured, spin the installation tool to remove and cap off the socket or install the resistance core so rubble does not enter the socket.
NB: If installing Impact Recovery Bollards - we have a Surface Mount option.
VIEW INSTALLATION INSTRUCTIONS
FREE-STANDING BOLLARDS - SOIL
When installing sockets directly in soil (or using the Extra Heavy Duty Resistance Core) you need a large footing so it is more imperative than ever that you make the concrete reusable (IE: Must be min Min 30MPa to be impact resistant) minimum 650 mm depth x 400 mm width.
NB: Socket does not alter the size concrete footing required- it is simply a protective shield to make the concrete footing re-usable. Socket is installed flush with surface and must be completely encased in quality 30MPa concrete.
We recommend you install a 650 mm - 1m x 400 mm square foundation to provide stability and ensure against dislodgement when an item is impacted.
For bollards likely to be impacted by trucks or heavy vehicles increase depth accordingly and you can use a reo cage for further support.